How to Clean a Generator Carburetor? – [Easy Steps]
Like the air filter and spark plug, the carburetor of the generator also needs a periodic cleanup to provide optimum performance.
If it’s not cleaned, your generator will burn more fuel, provide fluctuating voltages, and misfire, or, in harsh cases, you may have to try hard to even start the generator.
In this article, I am going to show you how to clean a generator carburetor safely within a few beginner-friendly steps.
Moreover, I am going to share some obvious symptoms that indicate that our generator’s car is crying for a deep clean-up.
How to Clean a Generator Carburetor?
Each generator has slightly different carburetors in design and shape, and you may find them at different locations.
Below is the universal method to clean the carburetor; however, for locating the carburetor,.
Quick Summary
- Prepare the Tools and Safety Equipment.
- Turn off the Machine and Locate the Carburetor.
- Turn off the Fuel Value/Fuel Cap and Drain the Fuel From the Carburetor.
- Disconnect the Fuel Lines and Replace the Gaskets if Needed.
- Remove the Carb and Clean Its Outer Body.
- Remove and Clean the Flowing Bowl of the Carb.
- Remove and Clean the Float Pin and Float/Flow of the Carb.
- Remove and Clean the Main Jet and Nozzle.
- Remove and Clean the Pilot Jet.
- Clean the Carburetor’s Holes, Air Passages, and Inner Body.
- Reassemble the Carburetor.
1. Prepare the Tools and Safety Equipment:
Following is the equipment we are using to clean the carburetors of the generators.
- Flathead screwdrivers (small and big).
- Pliers (include a nose plier as well).
- Socket and ratchet (8–10 millimeters, depending on the size of your carburetor main bolt)
- Carb cleaner.
- Safety goggles.
- A pair of gloves.
NOTE: Before starting the cleaning process, please go through the user manual to avoid any incidents. Below are some safety precautions we must take before cleaning the carburetor.
2. Turn off the Machine and Locate the Carburetor:
Remove the air filter cover and air filter. Inside the air filter hose, you will find a few screws, depending on the model of the generator.
Unscrew them with the help of a socket and rachet, and remove the breather tube as well.
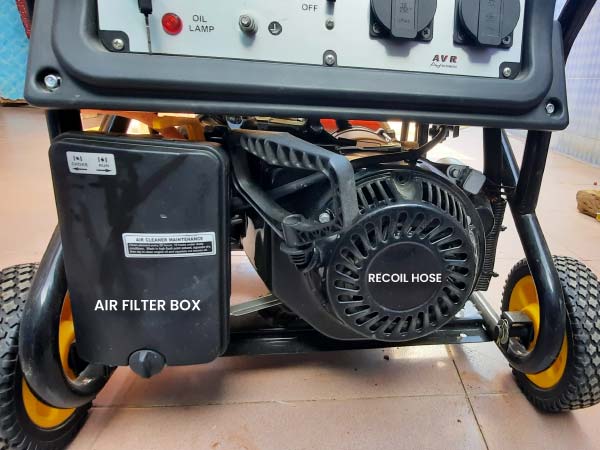
Note: Inverter generators mostly have a carburetor in the enclosure; you have to remove the enclosure with a flathead screwdriver; however, in an open-frame generator, you can find them at the bottom behind the air filter assembly.
3. Drain the Fuel From the Carburetor:
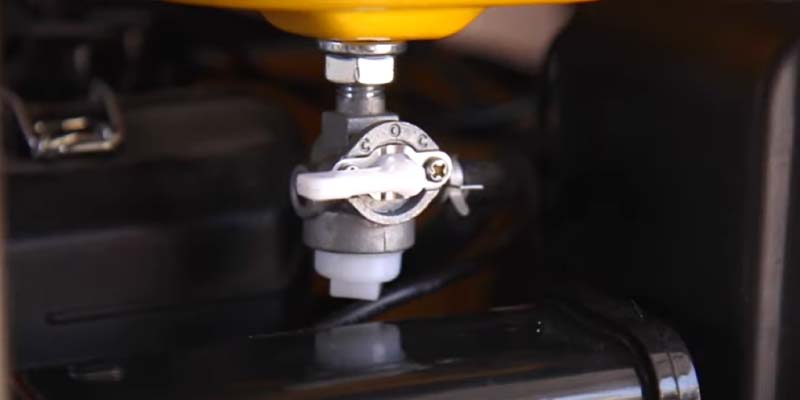
Inverter generators have a decent fuel drainage system; you just have to locate the drainage tube and follow the user manual to drain the excessive fuel; however, in the case of an open frame, you have to turn off the fuel valve.
4. Disconnect the Fuel Lines and Replace the Gaskets if Needed:
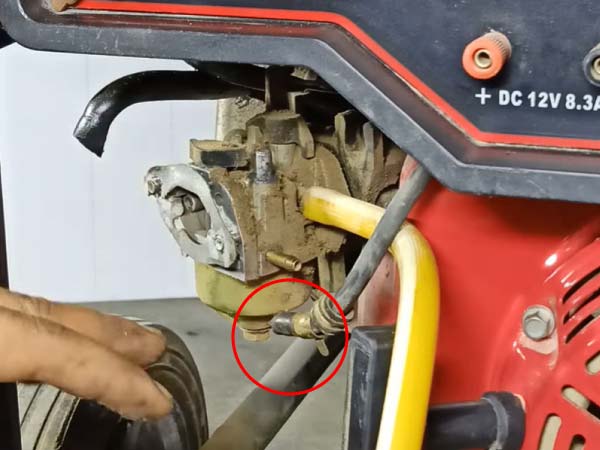
Unclip the fuel lines with a nose plier and deeply examine the gaskets. If you find any crakes or broken surfaces, make sure to replace them.
5. Remove the Carb and Clean Its Body:
Inverter generators mostly have electronic throttle control on top of the carb with a plastic body and some wiring; you just have to remove the wires and the carb.
In the case of open-frame old or newer models, you will find a governing rod and spring that should be removed safely before removing the carb.
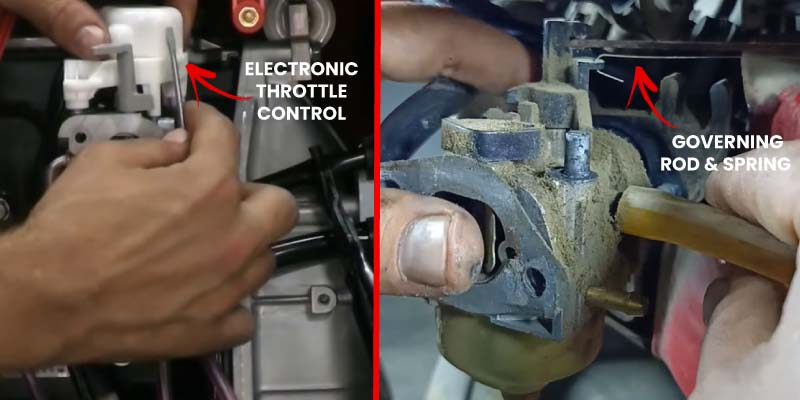
After removing the carburetor, make sure to use the carb cleaner or gasoline to clean the body of the carburetor. Make sure to wear a pair of gloves and safety glasses before using the carb cleaner.
NOTE:
- In the case of an open frame generator, you have to slightly move the carb, remove the governing rod, and then spring.
- In the case of an inverter generator, you have to remove the electronic throttle control before removing the carb.
6. Remove and Clean the Flowing Bowl of the Carb:
Unscrew the float bowl bolt of the carb located on the bottom and the gasket on the edges; don’t remove the drain bolt. Apply a few sprays of carb cleaner in the flowing bowl and remove unnecessary dirt, debris, and rust with a brush or the tip of a flathead screw if needed.
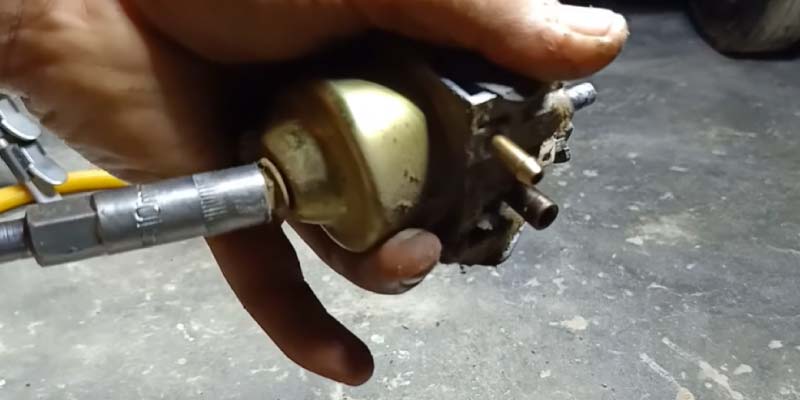
Furthermore, I mostly have a tray to accumulate the bolts and gaskets of the carburetor. In case they are lost, you may have to struggle to find the same parts.
NOTE: Inspect the gasket that seals the flow bowl and carburetor; make sure to replace it even if you find some minor cracks.
7. Remove and Clean the Float Pin and Float/Flow of the Carb:
The float pin is located inside the flowing bowl; you just need to remove the float pin by pulling it in the backward direction and removing the float or flow.
Apply a few sprays of carb cleaner to the flow and float pins; also, make sure to clean the tips of the flow pin and float valve with cotton buds dipped in carb cleaner.
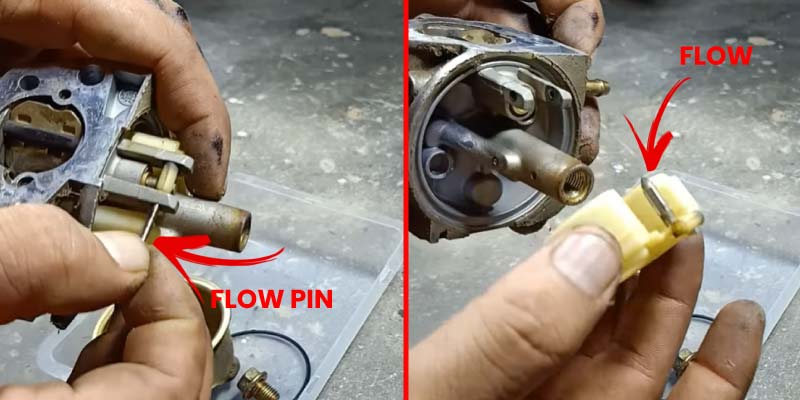
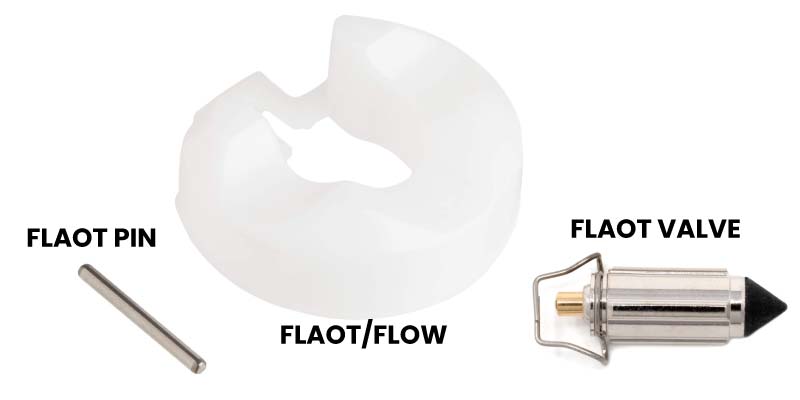
NOTE: Inspect the condition of the float pin, float valve, and float; if you find any rust, broken surfaces, etc., this could be the reason for fuel leakage.
8. Remove and Clean the Main Jet and Nozzle:
The main jet is mostly located inside the center post or hole; remove the main jet with the flathead screwdriver and remove the nozzle behind it.
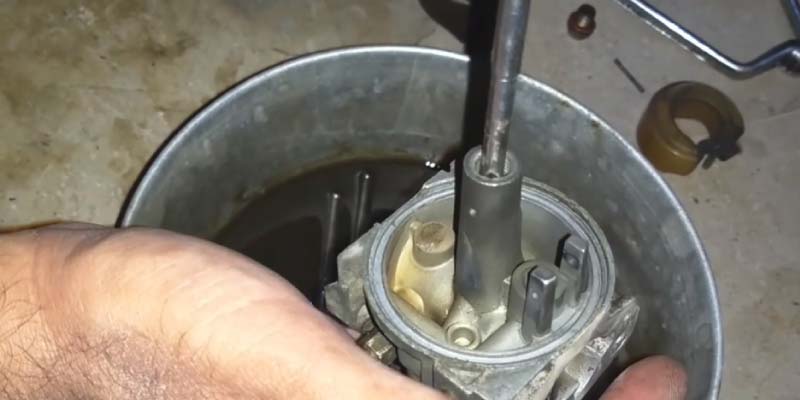
You will find small holes in the body of the nozzle and the main jet. Take the carb cleaner and hit a few sprays through the main holes of the jet and nozzle, and clean the holes with a small metal wire if needed.
Spray some compressed air after the cleaning process.
Note: If you find the main jet on the side of the center post or hole, the nozzle should be fixed. We highly recommend watching the video below to see what types of carburetors are available on the market and how to clean them.
9. Remove and Clean the Pilot Jet:
Underneath the idle screw, you will find the pilot jet. You just need to unscrew the race/idle screw and pop up the pilot screw with the help of a flathead screwdriver.
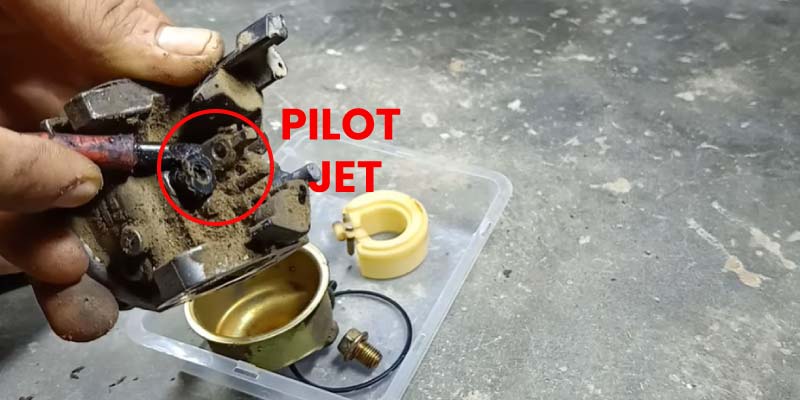
Like the main jet and nozzle, the pilot jet also has holes that should be cleaned with the carb cleaner, metal wire, and compressed air.
Don’t be harsh with it; the pilot screw is not durable.
10. Clean the Carburetor’s Holes, Air Passages, and Inner Body:
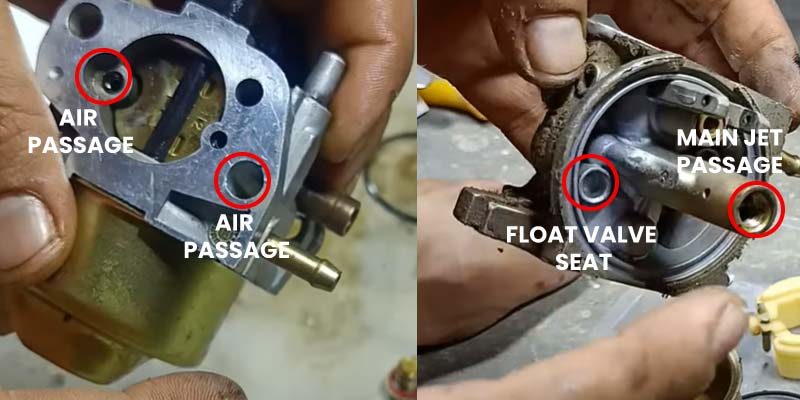
Spray the carb cleaner inside the main jet and the pilot jet passages; also hit a few sprays inside the float valve seat. I always dip a cotton bud in the carb cleaner and clean those passages more precisely.
11. Reassemble the Carburetor:
Reassemble the carburetor in the right orientation. The main jet, nozzle, and pilot jet should sit safely; also, don’t over-tighten the jets; a few normal turns would be enough.
Does Cleaning the Carburetor of My Generator Necessary?
To maintain efficiency, smoothness, and safe running, you have to clean the clogged carburetor first before doing any other task.
Like our hearts, which need a mixture of blood and oxygen, the carburetor also needs a proper mixture of air and fuel.
If it is imbalanced, you will face numerous problems; in some cases, our generator won’t start.
The clogged or gummed carburetor will provide an improper mixture of fuel to the combustion chamber; as a result, your generator misfires provides fluctuated voltage, has a hard start, or, in some cases, you will have to face an overflow of fuel.
What Are the Symptoms of a Bad Carburetor?
Below are the symptoms of a clogged or gummed carburetor; you have to cross-check them with your generator’s conditions.
Generator Won’t Start or Needs More Effort to Start:
As the carburetor becomes dirty, the debris and dirt present in the carb will disturb the air and fuel ratio. As a result, the generator won’t start, or you will have to work hard to fire up your generator.
Make sure to clean the carb as per our instructions for providing clean air passage to your machine.
Recommended Guide: 10 Reasons Why Generator Won’t Start
Carburetor Flooding:
Since the fuel-to-air ratio is unbalanced, we may see leaking fluid from the carburetor seals; in some cases, we found a wet spark plug as well.
In my case, one of my teammates doubts that the fluid in a spark plug is a sign of a bad ring and piston; however, after cleaning the carburetor, the generator is working fine.
For testing purposes, you can hit a few sprays of starting fluid directly in the carburetor if the engine still doesn’t start. You have only the option to do a deep cleaning of the carburetor.
Black Smoke From the Exhaust:
Due to the unbalanced air-to-fuel ratio, the generator burns more fuel, and as a result, we found black smoke with a strange smell.
The Generator Misfires:
Due to the dirty carb, your generator may intake less fuel or air for burning; as a result, you will find it rough or lean.
The average fuel-to-air ratio in gasoline generators is 14.7:1. If it is unbalanced, your generator’s engine will run too rich or lean.
Voltage Dropping:
Due to the excessive misfiring, the rotor can’t work efficiently, and as a result, you will find a slight voltage drop.
We recommend our users not use any voltage-sensitive appliance unless they have found and fixed the actual problem of voltage dropping.
Higher Consumption of Fuel:
Due to the clogged carburetor, you may find unburnt fuel in the exhaust of the generator, which is a leading cause of higher fuel consumption.
Also, in some cases, you may find that the ratio of fuel increases compared to normal; however, the engine doesn’t require that, so your generator is wasting too much fuel.
Overheating or Backfiring:
Due to the lean or too-rich mixture of fuel, the generator starts backfiring, and in some cases, you will also face an overheating problem.
Make sure to check out the air filter and spark plug first if you face overheating or backfiring.
How Do I Keep My Generator Carburetor From Gumming Up?
The following prevention methods could be a helping hand for you:
Don’t’ Store the Generator With Fuel:
Since the fuel has properties of oxidation (especially ethanol fuel), it tends to leave some debris and dirt in our generator’s carburetor.
I always drain the fuel from my camping generator’s tank and carburetor as well, if I don’t have plans to go camping for about 10 – 15 days.
One of my buddies Freddy has also written a guide about draining the fuel from the generator.
Keep Avoid Dirty or Old Fuel:
Old or dirty fuel would be a nightmare for your generator, though the modern generator has a filter on the top of the fuel tank to block the dirt and debris, still, the small amount of dirt that can’t be refined with the filter can be entered into the generator’s carburetor.
Furthermore, the old gasoline can corrode the carburetor’s internals, as a result, you will find a dirty or gummed carburetor.
PRO TIP: Use a fuel stabilizer if you are going to store the generator for a longer time. Simply you have to add the right amount of fuel stabilizer to the generator’s fuel tank.
Check the Air Filter:
A cracked air filter will surely provide dirty air to the carburetor as a result the carburetor is overwhelmed with dirt and debris.
The simple solution is you have to replace the air filter of the generator.
Wrapping – Up
Cleaning the carburetor isn’t a big task; however, it needs a bit of attention. When I was new I took images first before disassembling any part.
You can also do that before removing any complicated parts from the carburetor so that you can again see the proper orientation from the images.
Before doing the cleanup make sure to diagnose first, If you find something wrong and it could be related to the carb don’t waste the time just do it.
Let us know in the comments section if you are still confused about something!
Frequently Asked Questions – FAQs
Can I Put Carb Cleaner in the Generator?
Yes, you can. We stress to our generator technicians to use the carb cleaner to remove the dust from the root. A few sprays of carb cleaner would be enough to shine the jets, carburetor bowl, and emulsion tube properly.
Can You Use WD40 as a Carb Cleaner?
WD40 is not a carb cleaner; however it is a water dispersant and a light lubricant, it could be used for other purposes like cleaning corrosion, and prevent from rusting by spreading a thin layer of oil on the metals. We strongly recommend using carb cleaner instead of WD40.
Where Do You Spray Carburetor Cleaner?
You can spray the carb cleaner at the following spots. Jets and air passages.Main and pilot jet holes. Flow bowl, float pin, and float valve.The body of the carb.
How to Clean Wen Generator Carburetor?
Since most generators have a similar orientation to the carburetor, Our carb cleaning steps are applicable for almost every brand, make sure to have a look at them.

Josh is a highly skilled electrician with specialized expertise in the field of generators. With years of experience under his belt, he has established himself as an expert in all aspects of generators, ranging from installation and maintenance to troubleshooting and repairs. Josh’s in-depth knowledge of electrical systems and his commitment to staying updated with the latest industry advancements make him a reliable and sought-after professional.


