How to Build a Solar Generator? – Simple DIY Steps
In this article, we have explained how to build a solar generator using very simple DIY steps so that even a beginner can build his own unit within budget.
Millions of crude oil barrels have been saved since the introduction of solar power. A large population is converting to partial solar power daily, even in 3rd World Countries.
A solar generator is a great example of exploiting free renewable energy to its fullest.
For campers, van dwellers, and RV owners, a solar power station is lifesaving because it provides a portable, convenient, free, and powerful energy solution to replace gasoline generators.
But sometimes solar generators can be expensive. So if you are a DIY or tech-savvy guy, or you want to reduce your carbon footprints, why not build your own small solar generator?
In this article, I am going to explain how to build a DIY solar generator in a very simple way so that even a newbie in this field can understand.
How to Make a DIY Solar Generator – 5 Steps
- Purchase an inverter, battery, charge controller, breakers, and tools.
- Test the equipment before the installation
- Preparation before the mounting
- Mount the inverter, battery, charge controller, and breakers
- Properly wire down everything.
If you also know about ready-made solar generators, we have a high-class article on them as well.
What Do I Need to Build a Solar Generator?
1. Calculate the Power Requirement
Before building a DIY solar generator, the smart thing to do is to calculate the power requirement of your house, RV, camper, or off-grid cabin.
We also add 15 to 20% extra to the total energy requirement because there are always some power losses. It is for safety.
You can calculate the total wattage by using the following formulas:.
Watt Formula:
Watts = Volts x Amps
For example:
Your refrigerator’s label says 5 amps and 120 volts.
Watts = Volts x Amps
= 5 x 120 = 60 watts.
If the total wattage consumption of your RV, camper, or home is 800 watts, you need to build a solar generator rated at 1200.
Giving You Another Example for Camping:
The following appliances are mostly used on camping trips:.
| Device | Amps | Hours |
|---|---|---|
| Mini-Fridge | 4 | 15 |
| LED lights | 0.5 | 7 |
| Phone Charger | 2 | 3 |
| Laptop | 2 | 5 |
| Total | 83Ah |
If all of your appliances are 12V regulated, then:
83Ah x 12V = 996Wh
Now consider 6 hours of daylight.
996Wh/6H = 166W
You would need to build a solar generator rated at 166W with a 996Wh capacity. Add 15 to 20% extra to the total result, so you would roughly get 199W. So you would need to make a 200-watt solar generator.
Power Requirement for an RV:
| Appliances | Watt | Running Hours | Total |
|---|---|---|---|
| 4 LED lights | 20W | 6 | 120Wh |
| Phone and Laptop | 80W | 6 | 240Wh |
| Mini-Fridge | 50W | 15 | 600Wh |
| LED TV | 50W | 6 | 300Wh |
| Small DC water pump | 50W | 2 | 100Wh |
| 1 Drone | 20W | 2 | 40Wh |
| Total | 270W | 1400Wh |
You would roughly require a 300- and 1500-watt power station.
You can use the above-mentioned calculation to calculate the total power requirement. Don’t forget to add 15 to 20% extra to the total result.
Before you do that, you need to understand the difference between starting, peak, and surge watts and running, rated, and continuous watts.
What Are Starting and Running Watts?
Starting, or peak watts, is the power needed for a few seconds to start motor-driven devices such as power tools to overcome inertia.
Rated or running watts are watts needed for a device or tool to run continuously.
Following is a list of the most commonly used appliances.
Appliances and Their Power Consumption:
| Appliances | Running Watts | Starting Watts |
|---|---|---|
| Window air conditioner | 1,200 | 1,800 |
| Electric blanket | 200 | 200 |
| Dehumidifier | 240 | 240 |
| Space heater | 600 to 1,500 | 600 to 1,500 |
| Vacuum | 300 | 500 – 600 |
| Home theater | 300 | 400 – 500 |
| Sump pump | 800 | 1,500 to 3,000 |
| Well pump | 1,000 | 2,000 to 4,000 |
| Coffee maker | 800 – 1000 | 1000 – 1200 |
| Air fryer 1500w – 1500 starting watts. | 1500 | 1500 |
| Electric pressure cooker | 1000 | 1000 |
| Toaster | 850 | 900 – 1000 |
| Dishwasher | 350 | 400 – 500 |
| Electric kettle | 1500 | 3000 |
| Lawnmower | 1000 | 1500 |
2. Get a Solar Charge Controller
To get the maximum voltage out of your solar panels, you would need to invest in a solar MPPT charge controller. It increases the charging efficiency by up to 30%. It is more useful in cold places with fewer sunny hours.
I got a list of the top 3 MPPT charge controllers that I have personally tested.
| MPPT | Amps | Max: V | Batt Voltages | Price |
|---|---|---|---|---|
| Victron Smart Solar MPPT | 35A | 150V | 12, 24, 36, and 48V | $400+ |
| Renogy Rover | 40A | 100V | 12V, 24V | $150+ |
3. Get Yourself a Battery
We will build a light setup for beginners, so a 100-Ah battery with lithium-ion phosphate chemistry will do the job. I have prepared a list of potential DIY solar generator batteries.
| Battery | Weight | Dimensions | Ampere hours | Best feature | Type |
|---|---|---|---|---|---|
| Expert Power | 22.6Lbs. | 13 x 6.8 x 8.4 in | 100Ah | 10 to 11% more capacity than advertised | Lithium-ion |
| Lossigy LifePo4 | 23lbs | 19.05 x 6.69 x 9.45 in | 200Ah | 5000 cycles | Lithium-ion |
| Renogy 12V | 25.3lbs. | 6.8x 7.4 x 11.4 in | 100Ah | 8 times more cycles than SLA | Lithium Ion |
We have also got a detailed article on top RV batteries. Check it out.
4. Find a Suitable Solar Inverter
The solar panels will only be able to provide DC power. You would need to get yourself a decent pure sine wave inverter to convert the DC power into pure AC power.
A 2000W inverter will do the job. I have created a list of the top 2000W solar inverters with up to 4000W peak. A 2000W inverter might be overkill but if you want to expand your DIY system in the future, you can add another battery and panel to do so.
| Pure Sine Wave Inverter | Peak watts | Weight | Dimensions | Price |
|---|---|---|---|---|
| Renogy 2000W inverter | 4000W | 12lbs. | 17.8 x 8.6 x 4 inches | $240 to $350 |
| Go Power 2000W inverter | 4000W | 19lbs. | 16.6 x 8.2 x 6.5 inches | $950 – $1050 |
| GoWise Power 2000W inverter | 4000W | 12lbs. | 117.1 x 9.3 x 4 inches | $250 – $350 |
5. A rugged case
You would also need a rugged waterproof case to hold all the equipment together. The milk crate will also do the job but be careful to purchase the expensive quality one. A fragile milk crate will crumble under the weight.
6. Working Tools
- A utility life
- Tape
- Circuit breakers
- Screwdrivers
- Wire cutter and stripper
- Glue gun
- Drills and drill bits
- Port plug
- Voltmeter
Building a DIY Solar Generator
Step 1 – Purchase the following things
I am using the following things for my setup
- A milk crate
- 1000W MPP solar inverter with built-in charge controller
- 100Ah Ampere Time Battery
- Some DC ports
- A circuit breaker.
- Some handy tools
- Quality cables
Step 2 – Test the Equipment
- The red wire is the positive one that will go to the positive of all the devices.
- The black one is negative.
- So before you begin wiring everything, test the inverter. Connect the red (+ve) with the +ve terminal of the battery and inverter, and –ve with the –ve.
- Start up the inverter and connect some load into it to check if the setup is right or not.
- Check the BMS or MPPT charge controller as well.
Step 3 – Preparation for Mounting
I am a simple DIY kinda guy so I will make it as simple as possible. Get a milk crate for the following reasons:
- It has a lot of holes to pass the wires through.
- You can drill your holes into it as well.
- It is cheap and simple to carry around.
- The quality ones are rigid and strong.
Follow the steps:
- Insert the battery into the crate.
- Bolt it down so it would not jiggle even if you transport it in your travel trailer or RV.
- Pass the negative and positive cable from side openings.
- Leave some space inside the crate for the MPPT charge controller.
- The inverter will be mounted on the top of the crate so that we can easily connect positive and negative wires to it.
- The breakers will be connected to the side of the crate.
Step 4 – Mounting the Inverter and Breaker
So at the time, I only had a 1000W MPP solar inverter that had a 1000W pure sine wave inverter, and a 500W charge controller with a 20A AC charger.
So instead of connecting an external MPPT charge controller beside the battery in the crate, I installed a 250A Daly BMS.
Follow the Steps
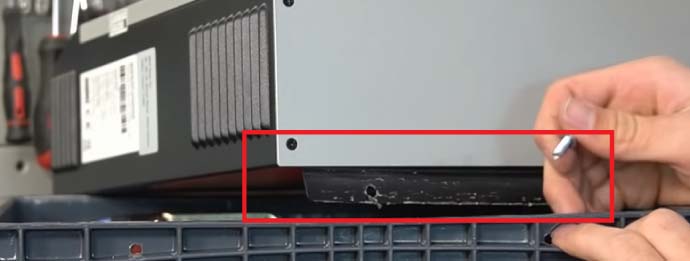
- Slap it on the top of the milk crate like just like Will Prowse from DIY solar did.
- Drill two holes into the crate and bolt it down.
- Make sure the mounting is solid and the inverter doesn’t wiggle.
For the Breakers
So the BMS I installed had overcurrent protection, but it is always wise to install your breakers.
For this setup, I am going to use a 100A breaker. If your setup requires 60 or 80A breakers, install 100A ones just to be safe.
Follow the steps:
- You are going to have to mount it underneath the inverter’s AC/DC input ports to save cable length.
- Make sure you bolt it tightly into the crate. These things shouldn’t wiggle.
- If you are using an MPPT charge controller, you are going to need two circuit breakers. One between the inverter and the battery, and the second between the inverter and the charge controller.
- My inverter has a charge controller of its own, and I am using a BMS, so I have only one circuit breaker.
Step 5 – Wiring Everything Down
- The red wire is the positive, and the black wire is the negative.
- The red positive wire will go from the positive terminal of the battery to the positive side of the circuit breaker, positive of the inverter, then positive of the second circuit break (if you have one), and then positive of the MPPT charge controller if you have one.
Connecting Positive red wire.
Battery > breaker > inverter > second breaker > charge controller
If your inverter has a charge controller and you are not using the second circuit breaker.
Follow these steps:
- Connect the positive wire from the battery to the breaker, then from the breaker to the positive DC input of the inverter.
- Now, connect the negative black cable from the battery to the negative DC input of the inverter.
- If you are using two separate black cables (one for the battery and one for the negative DC input of the inverter), then you are going to need a large bolt to connect both negative cables.
- For milk crate casing, there are a lot of openings and pathways to maneuver your cables but you are probably going to need more than one Red and Black cable, so large bolts will come in handy.
- Loose cables in a NO-NO! Bolt down everything tightly.
- After wiring everything down, turn on the breaker and start the inverter to check everything is working before connecting the solar input.
Connect DC Ports
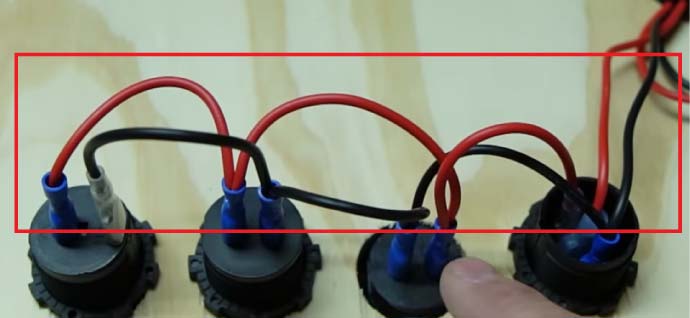
- Purchase a bar of DC ports or some other design depending on your personal preference.
- Bolt it to the milk crate near the inverter.
- Wiring is simple. Connect the positive red cable in parallel to all the ports, and the black negative in parallel as well.
- The positive-negative cable will go into the positive and negative common of the inverter. No rocket science in it.
Connect the AC input
- Turn OFF the circuit breaker.
- If your inverter has Ground, Live, and Neutral (G L N) symbols, they connect green to the ground, black to the life, and white to the neutral.
- The process is the same for AC IN and AC output.
- Turn on the breaker and check if the AC charging is working or not. Check the AC output as well.
Connecting the Solar Input
- Connect an XT60 connector to the inverter. It will go into the PV input ports.
- Connect that XT60 connector with the solar array.
- Check if it is charging or not.
- My MPP solar inverter can handle more than 100V and 500W of solar input.
- So a couple of 100W solar panels in series will do the job.
This System is best for:
This DIY solar generator system is best for van dwellers and RV guys. You can charge it with the alternator, 500W solar input, and even AC input.
Why Build Your Own Solar Generator?
Pros and Cons of DIY Solar Generator
What I Like
What I don’t

Alex Black is a seasoned electrical engineer with a remarkable 8-year track record specializing in appliances, generators, and transfer switches. With extensive hands-on experience in the field, Alex possesses a deep understanding of electrical systems and their intricate workings. Throughout their career, Alex has consistently demonstrated expertise in designing, troubleshooting, and maintaining various electrical appliances.


nice information. Thanks
My pleasure. Make sure to share it.