How To Clean Battery Terminals? – Safely Remove The Corrosion
In this article, we have discussed how to clean battery terminals professionally by using DIY methods, and how to safely remove the corrosion.
Did you open the battery cover of your electronic device and find a nasty mess inside its terminals? If you left your bike in storage for a long time, you might need to maintain the battery before hitting the road.
Or maybe you’re dealing with a car or household battery that has built up dirt and even corrode. We’ve all been through a similar kind of situation and the only solution to this problem is cleaning. By cleaning the terminals of a battery, you’ll make your battery last longer and stronger.
How To Clean Battery Terminals
The easiest way to clean the battery terminal is to take a teaspoon of baking soda, apply it to the terminals, pour some water on them, and use a brush to scrub the corrosion. You can also use sandpaper to scrub off the corrosion. It is one of the most effective methods to clean the terminals.
Materials Required For Cleaning
To clean the battery terminals of a car, you’ll need:
To clean the battery terminals of a bike, you’ll need:
These all are important materials you can use in case of cleaning any kind of battery terminal. You can also use dielectric grease if there’s any kind of leakage from alkaline batterie.
Cleaning Battery Terminals Of A Car
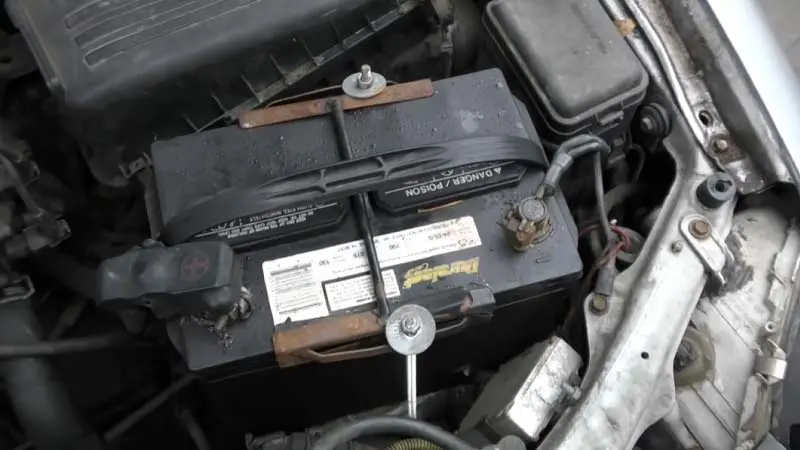
One of the major reasons for decreased performance and battery life of a car is corrosion.
Fortunately, this corrosion is quite easy to discover because you’ll notice blue, white, or green-tinged covering the battery terminals, battery cables, or battery posts. So here are some of the essential steps to follow while cleaning the corroded battery terminals.
Examine The Condition Of The Battery:
For cleaning a car’s battery, you don’t need to remove the battery from the vehicle. Just lift the hood of the car and assess its battery easily.
Mostly it is located on the front side of the engine block.
Thoroughly examine the state of the battery, if the battery isn’t leaking or cracked, you can start with its cleaning process. In case there are some cracks in your batter, it’d be better to replace it with a new one for your safety.
Examine The Cables And Clamps:
To find out the clamps or terminals, lift up the plastic cover of your battery. Examine both cables and clamps carefully. You’ll find a white, ashy deposit on the battery posts. If the corrosion or dirt is less, you can do its cleaning properly by just following this guide. Otherwise, if the damage is high, you’ll need to replace the cables and clamps to avoid more problems in the future.
Disconnect The Clamps Of The Battery:
Before starting the process of cleaning, you’ll have to disconnect the battery. To do this, use a wrench to loosen the nuts of the clamps. Then remove the negative clamp first marked with ‘– ‘. After removing the negative clamp, remove the positive clamp marked with ‘+’.
It will be hard to remove clamps if there is excessive corrosion. Pliers will be helpful to do this easily.
Note: You have to be careful while using pliers and do not touch any tool frame of the car made of metal while the battery is working. By doing so, you’ll short out the batter.
Using Baking Soda, Make A Cleaning Agent:
Take a bowl and mix 1 tablespoon of distilled water and 3 to 4 tablespoons of baking soda. Make a thick paste by stirring the mixture. Keep stirring until every particle of baking soda dissolves in water completely.
Baking soda will help in neutralizing corrosion from battery acid.
Apply Agent On Battery Connections:
Use an old toothbrush or dampened cloth to dip into the baking soda paste. Rub that paste on the corroded area of the battery. After applying the baking soda you’ll notice bubbles and foam will form at corroded places due to reaction. Leave the paste on the battery for 5 to 10 minutes to soak in and loosen the corrosion properly.
Use A Butter Knife To Scrape Off Corrosion:
If there are large deposits of corrosion present on the battery terminals, it’d be better to use the sharper edge of a butter knife to scrape them off. After scraping off the large deposits, use steel wires to clean leftover corrosion.
Note: While cleaning the battery terminals always wear vinyl dishwashing gloves. Your hands will be exposed to different caustic agents if you keep them uncovered during the cleaning phase.
There are also special brushes available on market for cleaning clamps and posts. But you can rely on an old toothbrush also for this purpose.
Rinse With Water After Brushing Off Corrosion:
After brushing off all the dirt and deposits, rinse it with water and dry the baking soda to remove it completely. Pour 2 cups of water on both of the terminals of the battery.
Avoid rinsing off baking soda into the batter vents, as it will neutralize the acids in the battery and lead to shortening the battery life. Battery vents are located on the sides of the battery to remove harmful gases away from the cabin of the car.
- Recommended Readings: What Is a Sulfated Battery?
Use A Dry Rag To Clean The Terminals:
Before reconnecting the battery, make sure to dry it completely. Terminals should be dry, and you can do it by using a rag to rub over them 3 to 4 times until they’re fully dried.
Avoid using paper towels in this step because the pieces of them can be left on terminals which can cause future hazards.
Also, make sure that the rag you’re using is free from oil or grease.
Apply Petroleum Jelly And See Winders:
Apply hydrophobic petroleum jelly in a thin layer on both the positive and negative terminals of the battery. Petroleum jelly will prevent the battery from catching corrosion again in the future.
Put the clamps back on the battery:
Now that the cleaning is almost complete, reattach the clamps to secure the battery and restore all the electrical connections. First, reattach the positive terminal and tighten it with the help of a wrench. After firmly attaching the positive terminal, now go for reattaching the negative clamp to terminal the negative terminal of the battery and tighten it.
Replace the rubber or plastic shields that cover the junctions of clamps or terminals.
- Checkout our list of the best golf cart batteries
How To Clean The Household Battery Terminal

Examine Battery Terminals For Corrosion:
Observe the cradle of battery terminals thoroughly and find out if there’s any corrosion. For accessing the battery cradle you’ll need to remove the cover. If there’s mild corrosion, it will appear as black spots and in case of severe corrosion there’ll be white color or there can be ashy deposits around the terminals of the battery.
Throw a battery that has acid leakage. Leakage such as potassium hydroxide is a strong base that can cause hazards, so use eye and hand protecting materials.
You can only perform cleaning of batteries that are corroded. If there’s any kind of leakage in batteries then throwing them out will be a better solution.
If you want to know why cleaning terminals and battery maintenance is important, read this research.
Make A Cleaning Paste With Water And Baking Soda:
Make a similar kind of water and baking soda solution as you made in case of cleaning corroded battery terminals of a car. Mix 3 tablespoons of baking soda and 15mL of water and stir to dissolve all components to make a thick paste.
Use A Cotton Swab To Rub Off Corrosion:
To clean the terminals of the battery with baking soda solution, use a cotton swab. Dip it into the mixture and apply it to rub at all corroded terminals. After applying the baking soda you’ll observe the foam formation in that specific place due to a chemical reaction.
Avoid any electronic device getting in contact with water during cleaning.
Cover your hands in vinyl dishwashing gloves and never touch any part with bare hands.
Wipe The Battery With Distilled Water And Cotton Swab:
After a certain time, there will be no further foam formation and at this time you’ll need to rinse off the inside of the cradle. Again, use a cotton swab and dip it into distilled water, and dab back and forth along the side of the cradle. The remaining baking soda will be removed and you will be able to make the connections again.
Wait for at least 20 minutes to dry out the battery and the cradle.
Close Cradles After Installing The New Battery:
Now as the cradle and batteries are cleaned, put them back in their place. After putting them back, close the cover and fix it firmly by applying some pressure.
You can enjoy your electronics now!
FAQs – Frequently Asked Questions
There’s a possibility of it but it doesn’t always happen. It won’t shock you and there will be no serious situation because it carries only 12volts but care is better than risk. Use vinyl gloves to avoid such risks.
You can use lemon juice or vinegar to neutralize the alkaline discharge and can easily clean the terminals of the battery.
You can apply anti-corrosion washers or use dielectric grease in a minor amount on battery posts. AMSOIL is a heavy-duty metal protector that can be used for the protection of battery terminals from catching rust.
Vaseline or petroleum jelly is an electrical conductor and it can be used in place of grease to fill the gaps of air that can otherwise lead to ozone build-up at the joint.

Alex Black is a seasoned electrical engineer with a remarkable 8-year track record specializing in appliances, generators, and transfer switches. With extensive hands-on experience in the field, Alex possesses a deep understanding of electrical systems and their intricate workings. Throughout their career, Alex has consistently demonstrated expertise in designing, troubleshooting, and maintaining various electrical appliances.


Thank you